How to Hang Bar Grow Lights Safely?

Time:2026-09-26 Author:Amelia
0%

Before adjusting plant spacing or chasing higher yields, treat a bar grow light as suspended electrical equipment. The question “How to hang bar grow lights safely” begins with the ceiling, not the plants. A secure setup protects people, equipment, and crops from falling fixtures, heat damage, and water contact.

Dr. Bruce Bugbee, a plant physiologist and lighting researcher, has often emphasized, “Plants don’t see light the way humans do.” That reminder matters here. Human comfort is not a reliable guide to plant lighting, temperature, or fixture placement. Safe installation requires more than choosing the correct height. It means checking the light’s weight, using rated hooks or mounting hardware, and confirming that every cable can carry the load. Never rely on adhesive strips or a loose cord.

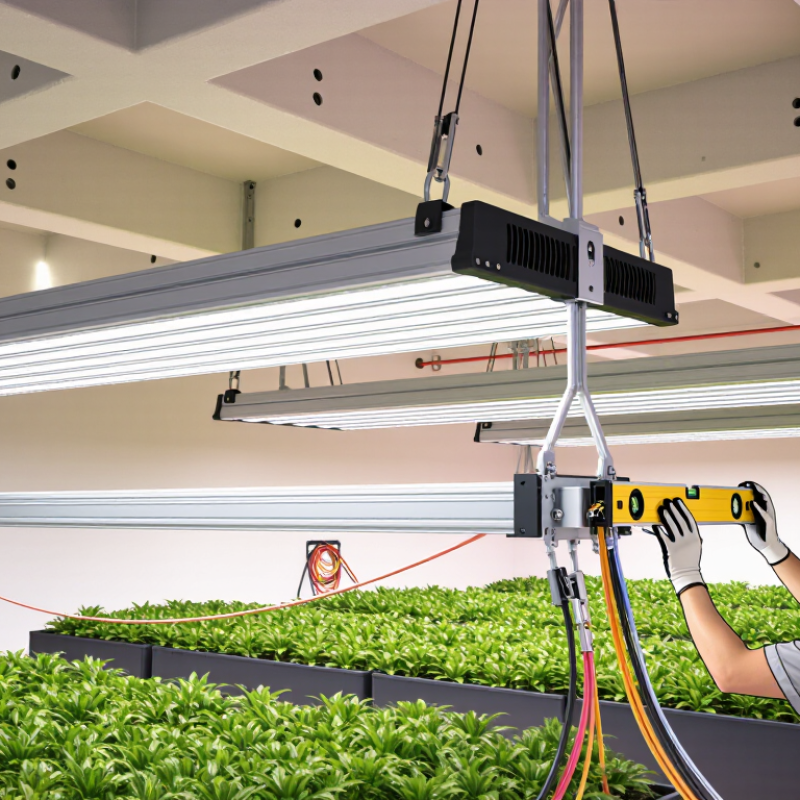
Begin with a clear inspection. Find solid ceiling framing, measure the hanging points, and keep the fixture level. Use secondary safety cables where the manufacturer recommends them. Keep power connections above possible splash zones, and leave enough space for airflow around the driver and light bars. The fixture should feel stable, not merely convenient.

Small mistakes happen. I have seen growers tighten one side first and leave the bar slightly twisted. That uneven tension can strain brackets over time. Recheck every connection after the first day, then inspect it regularly. Disconnect power before moving the light. If the ceiling, wiring, or load capacity is uncertain, ask a qualified electrician or installer to review the setup. Safe lighting is not dramatic. It is deliberate, visible, and repeatable.
How to Hang Bar Grow Lights Safely?

Choosing the Right Bar Grow Light and Mounting Location

How to Hang Bar Grow Lights Safely: Choosing the Right Bar Grow Light and Mounting Location

Choose a bar grow light by its PPFD map, spectrum, coverage, and electrical efficiency. Watts alone do not show how much usable light reaches leaves. The U.S. Department of Energy’s 2023 Solid-State Lighting R&D Opportunities report identifies 200 lumens per watt as an important LED performance benchmark. However, horticultural fixtures should also provide clear PPFD data at the intended distance. University of Minnesota Extension guidance places many leafy crops near 12–17 mol/m²/day of daily light integral. Use a light meter when possible. Your eyes are poor sensors.

Mount the bars evenly above the canopy, rather than concentrating them over one pot. Keep the fixture level, and leave enough distance for plant growth. A 20–30 centimeter gap may suit some fixtures, but always follow the tested hanging range. Select ceiling anchors or brackets rated above the fixture’s weight. I prefer stainless fasteners and two independent support points. One support can loosen. Protect the power cable from sharp edges, heat, and standing water. Never let it hang beside a wet tray.

Check the location before drilling. Avoid blocked vents, curtains, and crowded shelves. Leave airflow around the driver and inspect mounting hardware monthly. The DesignLights Consortium’s horticultural lighting requirements emphasize documented performance and safety testing, not attractive packaging. My first layout was too low and caused leaf bleaching. I corrected it after measuring PPFD, but earlier measurement would have saved time. Safety is practical, not decorative.

Checking Electrical Safety and Preparing the Installation Area

How to Hang Bar Grow Lights Safely

Checking electrical safety should happen before measuring the hanging height. Unplug every light and inspect the cord, plug, housing, and wire entry points. Look for crushed insulation, loose terminals, scorch marks, or moisture inside the connector. Do not install damaged equipment.

Choose a dry, stable area with clear airflow. Keep water trays below the lights, not directly beneath electrical connections. Mount the bars to solid framing, using hardware rated for their weight. A light that slowly slips can pull wires tight. That mistake is easy to overlook. Leave enough clearance above the plants to prevent heat buildup, while following the fixture’s installation instructions.

Use a ground-fault protective device where moisture is possible. Never treat an extension cord as permanent wiring; OSHA identifies temporary cords as a workplace hazard when misused. The National Fire Protection Association reported about 32,950 U.S. home fires involving electrical distribution and lighting equipment annually from 2015 to 2019. Those fires caused an estimated 470 deaths, 1,100 injuries, and 1.3 billion dollars in property damage. The figures cover more than grow lights, but they show why small defects deserve attention. Before energizing the system, test the protective device, secure loose cables, and confirm that no connection rests on the floor. If the circuit needs new wiring, ask a qualified electrician to inspect it against local electrical requirements.

How to Hang Bar Grow Lights Safely? - Checking Electrical Safety and Preparing the Installation Area
No. Safety Check What to Verify Recommended Preparation or Installation Action Safety Result
1 Confirm the electrical rating Check the light’s voltage, wattage, frequency, and maximum current on its rating label or instructions. The electrical supply must match the required voltage and frequency. Do not connect the fixture to a supply that does not match its marked rating. Calculate the total load when connecting multiple fixtures to one circuit. Required
2 Inspect the power cord and plug Look for cuts, crushed insulation, exposed conductors, loose connections, bent pins, discoloration, or signs of overheating. Replace damaged cords or plugs before installation. Do not tape over serious cord damage or use a damaged extension cord. Required
3 Use suitable circuit protection Growing areas may contain water, humidity, and conductive surfaces. A ground-fault circuit interrupter or residual-current device may be required by local electrical rules. Use the appropriate protection for the location and have a qualified electrician install or verify it when necessary. Test the protective device according to its instructions. High priority
4 Turn off power before wiring Power must be disconnected before making electrical connections, changing mounting hardware, or adjusting wiring. Switch off the circuit at the breaker or disconnecting device, unplug the fixture, and verify that the circuit is de-energized before starting work. Required
5 Choose a structurally sound mounting surface The ceiling, shelf, frame, or support rail must safely carry the fixture, mounting hardware, and any connected accessories. Install into suitable framing or use anchors rated for the actual surface and load. Do not rely on weak panels, loose surfaces, or adhesive alone for overhead mounting. Required
6 Use compatible hanging hardware Hooks, cables, brackets, carabiners, and eye bolts must be compatible with the fixture and rated for more than the installation load. Use all supplied attachment points where applicable. Secure every connection and ensure that no sharp edge can cut a suspension cable or power cord. Required
7 Maintain clearance from plants and materials Leaves, plastic film, fabric, cardboard, and other materials can contact the fixture or restrict airflow. Follow the fixture’s specified hanging distance and keep combustible or heat-sensitive materials away from the light. Leave adequate space for airflow and maintenance. Required
8 Keep water away from electrical parts Water droplets, mist, nutrient solution, and condensation can reach the fixture, plug, connector, or outlet. Position the light and connections outside direct spray. Create a downward drip loop in the cord before the plug or connection so water cannot run along the cord into it. High priority
9 Check environmental suitability Verify whether the fixture is rated for the temperature, humidity, dust, and moisture conditions of the growing area. Use only equipment suitable for the environment. Do not place a fixture marked for dry locations in a wet or routinely misted area. Required
10 Route cables safely Cables should not be pinched, stretched, exposed to sharp edges, placed under foot traffic, or allowed to hang where they can be pulled. Secure cords with suitable clips or ties, keep them away from hot surfaces and water paths, and leave enough slack to prevent tension at the plug or connector. Required
11 Avoid overloading outlets and extensions The combined load of the light and other connected equipment must remain within the outlet, power strip, extension cord, and circuit ratings. Use properly rated equipment and avoid daisy-chaining power strips or extension cords. Follow local electrical requirements for permanent installations. High priority
12 Complete a pre-use inspection Confirm that the fixture is level, firmly supported, free from damage, and clear of water and obstructions. Check every fastener, connection, cable route, and clearance before energizing the light. Keep the area accessible for future inspection and cleaning. Required
13 Test the installation carefully The light should operate without flickering, unusual noise, burning odor, excessive heat, sparks, or repeated circuit trips. Restore power while standing clear of the installation. Turn it off immediately if any abnormal condition occurs, then disconnect power and investigate the cause. Required
14 Schedule periodic checks Vibration, humidity, plant growth, dust, and repeated adjustments can loosen hardware or damage insulation over time. Inspect the mounting system, cords, plugs, connectors, ventilation openings, and surrounding clearance regularly, and clean only when the fixture is disconnected and cool. Ongoing
Important: Always follow the fixture’s installation instructions and applicable local electrical codes. If the installation involves fixed wiring, a new circuit, wet-location equipment, or uncertainty about electrical safety, use a qualified electrician.

Installing Secure Mounting Hardware for the Grow Light

How to Hang Bar Grow Lights Safely

A secure grow light starts with the mounting surface, not the fixture. Inspect the ceiling, shelf, or frame for cracks, moisture, and loose joints. For overhead installation, fasten hardware into a solid joist whenever possible. If that is impossible, use anchors rated for the surface and the light’s full weight. Never trust a small screw in thin drywall. It may hold today, then fail without warning.

Use two independent suspension points for a long bar light. Adjustable steel cables or chains should carry the load evenly. Keep every connector fully closed and check that the safety cable remains slightly slack. Leave the manufacturer’s recommended clearance around the fixture. Good airflow reduces heat buildup near leaves, plastic, and wooden surfaces. Route the power cord away from water, sharp edges, and moving fans. Turn off power before adjusting anything.

Tips: Test the installation gently before switching on the light. Push upward and sideways with light pressure, then inspect each anchor. Recheck the hardware after the first week and after moving plants. I once found a tight-looking hook slowly turning in a soft wooden frame. It looked acceptable, but it was not secure. That small mistake changed my routine: I now mark the mounting points, photograph the setup, and record the inspection date. A level light also improves coverage, although perfect alignment is not always practical. Safety comes before symmetry.

Positioning the Light for Even Plant Coverage

Hang bar grow lights from a solid, adjustable support, not from thin shelving wire. Check the fixture’s weight, cable rating, and mounting hardware before plugging it in. Keep power connections above the watering zone. Leave enough slack for height changes, but secure loose cords away from leaves and fans. I prefer two attachment points for long bars. One point can twist unexpectedly.

Even coverage depends on measurements, not appearance. Place the bars parallel to the plant rows, with slight overlap between their footprints. Start with the fixture 30–45 centimeters above the canopy, then measure light at the center and four corners. A simple quantum sensor is more useful than judging brightness by eye. The University of Minnesota Extension identifies roughly 12–17 mol/m²/day as a useful daily light integral range for lettuce. Adjust height or dimming until the canopy approaches that target evenly.

The U.S. Department of Energy’s horticultural lighting research reports LED efficacies above 2.5 µmol/J for advanced systems. Efficiency still cannot fix poor placement. Dark edges reveal excessive spacing. Bleached centers suggest excessive intensity. My first arrangement was too high, and the outer leaves stretched noticeably. I corrected it by narrowing the bar spacing, not by adding power. Recheck the grid after plants grow. Canopies change quickly, and yesterday’s even pattern may fail tomorrow.

Testing the Setup and Maintaining Safe Operation

Before hanging bar grow lights, test the support point and the electrical setup. Use hooks, chains, or brackets rated above the light’s weight. The bar should remain level and stay clear of leaves, fabric, and stored items. I keep cables slack, but never loose enough to touch water trays. A grounded outlet and a timer with a suitable rating add practical protection. Check the fixture’s instructions for minimum hanging distance and ventilation needs.

Tips: Run the light for 30 minutes before leaving it unattended. Feel the ceiling mount, cable, and fixture casing. They should not become unusually hot. Watch for flickering, buzzing, loose connectors, or a warm plug. If anything seems wrong, switch off the power first. Small details matter.

Safe operation requires regular inspection. Wipe dust from the bar only after unplugging it. Dust can trap heat around vents and connectors. Keep spray bottles away from the powered light. I also check the hanging hardware weekly, especially after adjusting plant height. Once, I tightened a hook too quickly and slightly twisted the bracket. It held, but that was a warning to slow down. Replace damaged cables instead of taping them as a permanent repair. Recheck the timer after power interruptions, because a light running overnight can stress plants and equipment.

FAQS

What should I check when choosing a bar grow light?

Compare PPFD maps, spectrum, coverage, and electrical efficiency. Wattage alone does not show how much useful light reaches leaves. Measure it.

How high should I hang the light above plants?

Follow the fixture’s tested hanging range. A gap of 20–30 centimeters may suit some lights, but not every setup.

How can I spread light evenly across a shelf?

Keep the bars level above the canopy, rather than directly over one pot. Leave room for plants to grow.

What mounting hardware should I use?

Fasten into a solid joist when possible. Use anchors rated for the surface and fixture weight. Two support points are safer.

How can I tell if the installation is stable?

Gently test the fixture before turning it on. Check that anchors hold and connectors are fully closed. Recheck them after the first week.

What electrical safety checks should I make?

Unplug the light and inspect its cord, plug, housing, and wire entry points. Do not install equipment with damaged insulation or scorch marks.

How should I protect cables around water?

Keep connections away from trays and standing water. Route cords away from sharp edges, heat, and moving fans. Not beside a wet tray.

How often should I inspect the setup?

Check mounting hardware monthly and after moving plants. I once mounted a light too low, and leaf edges bleached. Measuring earlier would have helped.

Conclusion

Learning how to hang bar grow lights safely starts with selecting a light that suits your plants, growing space, and available power supply. Choose a stable mounting location with enough clearance from leaves, water, and surrounding equipment. Before installation, inspect the power cord, outlet, and timer, and make sure the area is dry, clean, and free from trip hazards. Turn off the power while preparing the setup, and use mounting hardware designed to support the light securely.

Install brackets, hooks, or adjustable supports according to the light’s weight and the mounting surface. Position the bar so it distributes illumination evenly across the plant canopy without creating excessive heat in one area. After installation, test the light, check that all connections remain secure, and watch for flickering, unusual heat, or loose hardware. Regularly clean the fixture, inspect cables and supports, and adjust the height as plants grow. Following these steps provides a practical answer to how to hang bar grow lights safely while supporting consistent plant growth.

Amelia

Amelia

Amelia is a seasoned marketing professional with a wealth of expertise in our company’s core offerings. With an unwavering passion for driving growth and innovation, she plays a pivotal role in shaping our marketing strategies and enhancing brand visibility. A key aspect of her responsibilities......